OTP Authentication With AWS Cognito+ReactNative+AWS amplify
Hey guys WhatsUp, long time I am back with new content.This time I came up with a very interesting and trending concept these days. As this was a big topic I want to give it as a series. Without wasting time let's get into the topic.
My name is Sivasai Gangala, I am a full-stack developer from DhruthzuciTechsolutions, who loves to develop and build solutions using AWS services.

NOTE: Before getting into our topic I wanna divide the terms and give some brief explanations, it makes our life easy to understand what we are doing. so please read the blog post from start to end to gain some interesting facts about authentication.
Passwordless Authentication
Nowadays passwordless authentication getting huge responses from the tech industry. The main reason behind this is security, brute force attacks, and reused passwords. One more thing is no need to remember passwords. Hackers can steal or guess the passwords using brute force attacks. They can also buy lists of breached passwords on the dark web or acquire them using malware.
Types of passwordless authentication?
- Biometrics: Physical traits, like fingerprint or retina scans, and behavioral traits, like typing and touch screen dynamics, are used to uniquely identify a person. Even though modern AI has enabled hackers to spoof certain physical traits, behavioral characteristics still remain extremely hard to fake.
- Possession factors: Authentication via something that a user owns or carries with them. For example, the code generated by a smartphone authenticator app, OTPs received via SMS or a hardware token.
- Magic links: The user enters their email address, and the system sends them an email. The email contains a link, which when clicked, grants access to the user.
As there are so many types of passwordless authentication like a fingerprint, Facebook OTP-based all these come under the same category. Now I want to explain deep into OTP auth because we are focusing on OTP authentication.
Basically, OTP authentication is not considered as passwordless authentication, in OTP auth we are passing passwords at the server level which is used only for one session.
let's get into the development side………..
Here we are using AWS amplify as a framework for backend,AWS Cognito for user authorization and authentication and react-native for the mobile front end.
What is AWS Amplify
AWS Amplify is a development platform for building secure, scalable, mobile, and web applications. It hides the actual implementation details required to be done in AWS while providing a good developer experience you expected from your favorite terminal.
It covers the complete mobile application development workflow from version control, code testing, to production deployment, and it easily scales with your business from thousands of users to tens of millions. The Amplify libraries and CLI, part of the Amplify Framework, are open source and offer a pluggable interface that enables you to customize and create your own plugins.
Requirements
- AWS configuration………………………………………………Docs.
- AWS Amplify library and CLI…………………………………… Docs
- React-native-expo-CLI……………………………………………Docs
Create React-Native app
expo init React-app --template typescriptcd React-app.
Amplify
- Let’s add amplify to our project. Before that first install amplify cli into the system.
npm install -g @aws-amplify/cliamplify init- The above command adds the amplify backend environment into the project.
- Up to here, we are half done. Now come to Cognito.
Cognito with amplify
Before adding Cognito to the react app, we have to first understand how Amazon Cognito works.
Capabilities and Security
Amazon Cognito serves as a managed Auth service that provides user authentication and authorization capabilities to control access to your web and mobile apps. You also have access to Advanced Security features which include risk-based adaptive authentication and compromised credentials protection.
User Management
Amazon Cognito provides you the capability to better manage your users with User Groups and Custom Lambda Triggers that can be triggered during the user pool authentication such as user sign-up, confirmation, and post-confirmation. We are going to explore these triggers in the Amplify CLI to tweak the way we are going to authenticate the users.
Customizable Authentication Flow
Modern authentication flows incorporate new challenge types, such as Captcha and OTP, to verify the identity of the user on top of the existing password verifier. Amazon Cognito provides the ability to customize your authentication flow with AWS Lambda triggers as well.

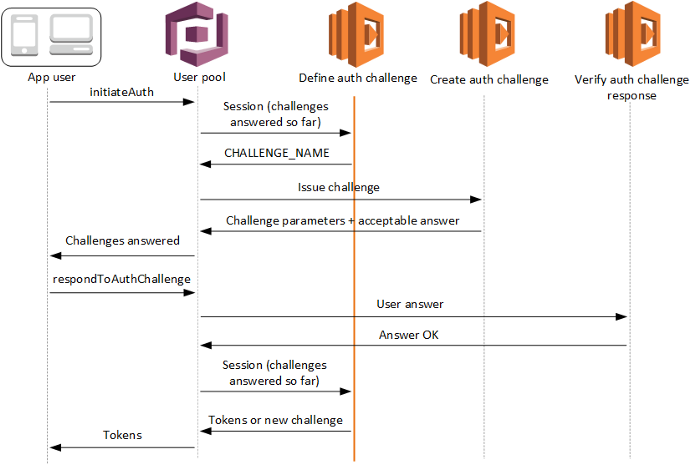
- Cognito doesn’t have a built-in passwordless feature, but it supports a custom authentication flow implemented as a state machine based on three Lambda function triggers that we need to implement.
- The define auth challenge Lambda is the state machine coordinator. It returns instructions to Cognito on how the flow should progress. The options are: a challenge is required; the authentication failed, or the authentication succeeded and tokens can be emitted. It is invoked by Cognito when a client calls the InititateAuth API.
- If a challenge is required, the create auth challenge Lambda creates it. It’s invoked right after the previous Lambda and is responsible for delivering the challenge to the user. This can be done through public challenge parameters returned by InitiateAuth, or through some other means. Private challenge parameters are shared with the verify auth challenge-response Lambda, typically including the challenge answer.
- The verify auth challenge-response Lambda is invoked by Cognito following the RespondToAuthChallenge API call, containing the challenge answer provided by the user. It returns whether the answer is correct, and Cognito invokes the define auth challenge Lambda again to decide whether the authentication can terminate or should continue with more challenges (in which case the create auth challenge Lambda gets called again).
- PreSignup lambda; we write some custom code to auto-confirm username or phone number.
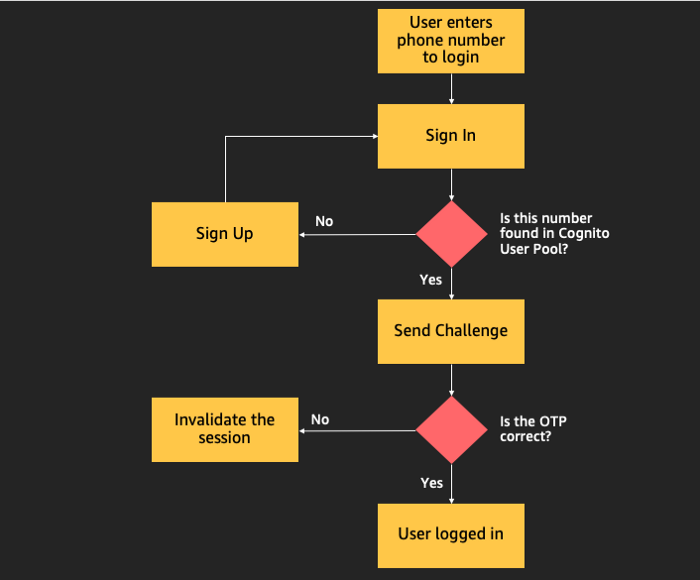
Let’s now take a look below at the authentication flow that we need to configure in this project.

Adding Cognito to our app
- Let’s go back to our main agenda which is to use AWS Amplify to provision the Auth features in AWS.
- The Amplify CLI supports configuring many different Authentication and Authorization workflows, including simple and advanced configurations of the log-in options, triggering Lambda functions during different lifecycle events, and administrative actions which you can optionally expose to your applications.
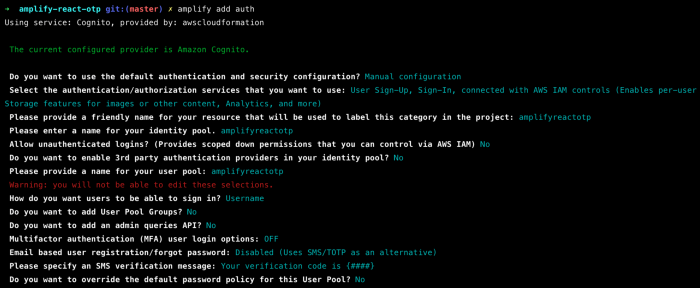
- And that is why we do not actually need to go back to the AWS Console to click and set up manually in the browser. Let’s now add auth features by selecting Manual Configuration.
amplify add authselect manual configuration- Give a friendly name for our AWS resources, user pool, and identity pool so that (if you have multiple projects) we can easily locate them in the future.

- What attributes are required for signing up?, you have to select Phone Number and unselect Email as we are going to use phone number only for user authentication.
- IMPORTANT: You have to note that you cannot change this attribute requirement for the sign-up process in the future. If you do need to change, you re-configure the auth components from start again.
- Do, you want to specify the user attributes this app can read and write?, you have to also select Phone Number for read and write.
- Do you want to enable any of the following capabilities? you have to select Custom Auth Challenge Flow (basic scaffolding — not for production) and we are going to update the code to make OTP authentication works for production usage.
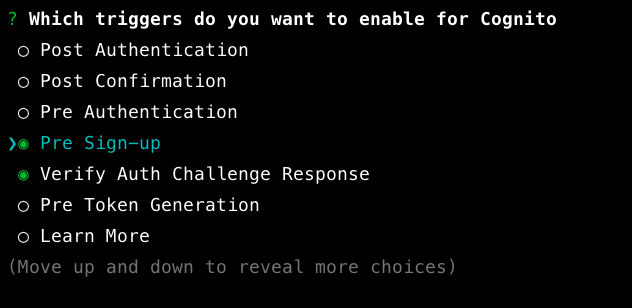
- Under Which triggers do you want to enable for Cognito, you will see that 3 of the lambda triggers are automatically selected for custom auth flow. Now, you have to select thePre Sign-up option too.

- After selecting the lambdas press enter to continue to and choose to create an own for pre-sign up lambda and enter after pressing enter, the terminal asks you to open the lambda function in the boilerplate. select yes.
These four functions are responsible for authentication.
Create auth challenge
Define auth challenge
Verify auth challenge-response
Pre sign-in lambda trigger
Create challenge auth.js
const AWS = require('aws-sdk');exports.handler = (event, context, callback) => {
  //Create a random number for otp
  const challengeAnswer = Math.random().toString(10).substr(2, 6);
  const phoneNumber = event.request.userAttributes.phone_number;  //sns sms
  const sns = new AWS.SNS({ region: 'us-east-1' });
  sns.publish(
    {
      Message: 'your otp: ' + challengeAnswer,
      PhoneNumber: phoneNumber,
      MessageStructure: 'string',
      MessageAttributes: {
        'AWS.SNS.SMS.SenderID': {
          DataType: 'String',
          StringValue: 'AMPLIFY',
        },
        'AWS.SNS.SMS.SMSType': {
          DataType: 'String',
          StringValue: 'Transactional',
        },
      },
    },
    function (err, data) {
      if (err) {
        console.log(err.stack);
        console.log(data);
        return;
      }
      return data;
    }
  );  //set return params
  event.response.privateChallengeParameters = {};
  event.response.privateChallengeParameters.answer = challengeAnswer;
  event.response.challengeMetadata = 'CUSTOM_CHALLENGE';  callback(null, event);
};
open create auth challenge cloud formation template.js file and paste the code.

{
  "Sid": "VisualEditor1",
  "Effect": "Allow",
  "Action": "sns:Publish",
  "Resource": "*"
}
Under the lambdaexecutionpolicy, you can paste in the following (as shown above) to add the permission to send SMS via SNS.
Define Auth challenge
 exports.handler = (event, context) => {
 if (event.request.session.length === 0) {
 event.response.issueTokens = false;
 event.response.failAuthentication = false;
 event.response.challengeName = ‘CUSTOM_CHALLENGE’;
 } else if (
 event.request.session.length === 1 &&
 event.request.session[0].challengeName === ‘CUSTOM_CHALLENGE’ &&
 event.request.session[0].challengeResult === true
 ) {
 event.response.issueTokens = true;
 event.response.failAuthentication = false;
 } else {
 event.response.issueTokens = false;
 event.response.failAuthentication = true;
 }
 context.done(null, event);
};
Verify Auth challenge
exports.handler = (event, context) => {
  if (event.request.privateChallengeParameters.answer === event.request.challengeAnswer) {
    event.response.answerCorrect = true;
  } else {
    event.response.answerCorrect = false;
  }
  context.done(null, event);
};
Pre signup
exports.handler = (event, context, callback) => {
  // Confirm the user
  event.response.autoConfirmUser = true;  // Set the email as verified if it is in the request
  if (event.request.userAttributes.hasOwnProperty('email')) {
    event.response.autoVerifyEmail = true;
  }  // Set the phone number as verified if it is in the request
  if (event.request.userAttributes.hasOwnProperty('phone_number')) {
    event.response.autoVerifyPhone = true;
  }  // Return to Amazon Cognito
  callback(null, event);
};
Lastly, let’s check that we have added the auth and function correctly by entering the following command and as shown in the screenshot below, we should be able to see all the new four functions and the auth resources.
amplify statusAnd now, let’s push the changes to AWS and let amplify does its magic.
amplify pushAdd AWS Amplify to your React-native app
We will need two npm libraries from @aws-amplify to configure and add auth to the React app.
npm add @aws-amplify/core @aws-amplify/authOnce the packages are added, we can go to the App.jsx to begin by importing and adding the following to the top of the file.
import Amplify from '@aws-amplify/core';
import Auth from '@aws-amplify/auth';
import awsconfig from './aws-exports';
Amplify.configure(awsconfig);
Adding some constants and variables
We need to add some constants and variables to store certain messages and values respectively for us to show the status of the authentication process, as well as to process and implement the authentication functions in the React app.
First, we will definitely need to display relevant messages first to tell the user at what state they are at. We can put these constants at the top of the codes for future easy reference and iterations.
const NOTSIGNIN = 'You are NOT logged in';
const SIGNEDIN = 'You have logged in successfully';
const SIGNEDOUT = 'You have logged out successfully';
const WAITINGFOROTP = 'Enter OTP number';
const VERIFYNUMBER = 'Verifying number (Country code +XX needed)';
Next, we will update the following four functions to begin using amplify auth functionalities.
const signOut = () => {};
const signIn = () => {};
const verifyOtp = () => {};
const verifyAuth = () => {};
We will also need to capture the user inputs for number as the user's phone number and otp for the OTP value needed to verify the challenge.
import React,{useState,useEffect} from 'react'import { Button, Text, TouchableOpacity, View,Platform,SafeAreaView,KeyboardAvoidingView,StatusBar,Image } from 'react-native'import { TextInput } from 'react-native-gesture-handler';import Icon from 'react-native-vector-icons/Feather';import styles from './Getotpcss';import styless from './Logincss';import { useNavigation } from '@react-navigation/native';import Svg, { Path } from 'react-native-svg';import Amplify from '@aws-amplify/core';import Auth from '@aws-amplify/auth';import awsconfig from './aws-exports';Amplify.configure(awsconfig);const NOTSIGNIN = 'You are NOT logged in';const SIGNEDIN = 'You have logged in successfully';const SIGNEDOUT = 'You have logged out successfully';const WAITINGFOROTP = 'Enter OTP number';const VERIFYNUMBER = 'Verifying number (Country code +XX needed)';function Newsa() {const navigation = useNavigation();const [message, setMessage] = useState('Welcome to Demo');const [user, setUser] = useState(null);const [session, setSession] = useState(null);const [otp, setOtp] = useState('');const [number, setNumber] = useState('');const password = Math.random().toString(10) + 'Abc#';useEffect(() => {verifyAuth();}, []);const verifyAuth = () => {Auth.currentAuthenticatedUser().then((user) => {setUser(user);setMessage(SIGNEDIN);setSession(null);}).catch((err) => {console.error(err);setMessage(NOTSIGNIN);});};const signOut = () => {if (user) {Auth.signOut();setUser(null);setOtp('');setMessage(SIGNEDOUT);} else {setMessage(NOTSIGNIN);}};const signIn = () => {setMessage(VERIFYNUMBER);Auth.signIn(number).then((result) => {setSession(result);setMessage(WAITINGFOROTP);}).catch((e) => {if (e.code === 'UserNotFoundException') {signUp();} else if (e.code === 'UsernameExistsException') {setMessage(WAITINGFOROTP);signIn();} else {console.log(e.code);console.error(e);}});};const signUp = async () => {const result = await Auth.signUp({username: number,password,attributes: {phone_number: number,},}).then(() => signIn());return result;};const verifyOtp = () => {Auth.sendCustomChallengeAnswer(session, otp).then((user) => {setUser(user);setMessage(SIGNEDIN);setSession(null);}).catch((err) => {setMessage(err.message);setOtp('');console.log(err);});};const hula = () => {verifyOtp();navigation.navigate('webview');}return(<View><Text>{message}</Text>{!user && !session && (<View><KeyboardAvoidingViewbehavior={Platform.OS === 'ios' ? 'padding' : 'height'}keyboardVerticalOffset={Platform.OS === 'ios' ? 10 : 0}><View style={styless.container}><StatusBar backgroundColor="#5566ee" barStyle="light-content" /><SafeAreaView style={styless.headerwraper}><View style={styless.header}><View><Icon name="chevron-left" size={24} style={styless.iconWhite} /></View><View ><Text style={styless.headertext}>Send code</Text></View><View style={{ width: 20 }} /></View><View style={styless.headert} ><Image style={styless.imag} source={require('./images/h11.png')} /></View></SafeAreaView><View style={styless.content}><View><Text style={styless.title}>Personal info</Text></View><View style={styless.input}><TextInput keyboardType={'phone-pad'}placeholder="(+xx)your Phone number"placeholderTextColor='#ababab'value={number}onChangeText={setNumber}/></View><View><Text style={styless.description}> we will send you averification code to your phone number</Text></View><View style={styless.buttonwrapper}><TouchableOpacity style={styless.button} onPress={signIn}><Icon name="arrow-right" size={25} style={styless.iconbutton} /></TouchableOpacity><View style={{ flexDirection: 'row', paddingTop: 10 }}><TouchableOpacity style={{padding: 20, backgroundColor: '#5566ee',marginRight: 25,borderRadius: 10,}} onPress={verifyAuth}><Text style={{ color: '#fff', fontSize: 10,fontWeight:'bold' }}>am i sign in?</Text></TouchableOpacity><TouchableOpacity style={{padding: 20, backgroundColor: '#5566ee' ,borderRadius: 10,marginRight: 10}} onPress={signOut}><Text style={{ color: '#fff', fontSize: 10,fontWeight:'bold' }}> Sign Out</Text></TouchableOpacity></View></View></View></View></KeyboardAvoidingView></View>)}{!user && session && (<View><KeyboardAvoidingView style={styles.container}behavior={Platform.OS === 'ios' ? 'padding' : 'height'}keyboardVerticalOffset={Platform.OS === 'ios' ? 10 : 0} ><View style={styles.container}><StatusBar backgroundColor="#ffff" barStyle="dark-content" /><SafeAreaView><View style={styles.header}><TouchableOpacity><Icon name="chevron-left" size={24} style={styles.headericon} /></TouchableOpacity><View ><Text style={styles.headertitle}>Verification code</Text></View><View style={{ width: 20, }} /></View></SafeAreaView><View><View style={styles.svgWrapper}><Svg viewBox="0 0 1440 320"><Path fill="#5566ee" d="M0,288L48,272C96,256,192,224,288,197.3C384,171,480,149,576,165.3C672,181,768,235,864,250.7C960,267,1056,245,1152,250.7C1248,256,1344,288,1392,304L1440,320L1440,320L1392,320C1344,320,1248,320,1152,320C1056,320,960,320,864,320C768,320,672,320,576,320C480,320,384,320,288,320C192,320,96,320,48,320L0,320Z" /></Svg></View></View><View style={styles.content}><Text style={styles.otptitle}> Conformation</Text><Text style={styles.otpdescription}>please type the varification code</Text><View style={styles.input}><TextInput keyboardType={'phone-pad'}placeholder="Enter 6 digit otp"placeholderTextColor='#ababab'maxLength={6}value={otp}onChangeText= {setOtp}/></View><TouchableOpacity style={styles.button}><Icon name="chevron-right" size={24} style={styles.iconbutton} onPress={verifyOtp} /></TouchableOpacity></View></View></KeyboardAvoidingView></View>)}</View>)}export default Newsa;
App.js
import { NavigationContainer } from '@react-navigation/native';import { createStackNavigator } from '@react-navigation/stack';import React from 'react';import Newsa from './src/Newsa';const AppStack=createStackNavigator();const App = () => {return(<NavigationContainer><AppStack.NavigatorheaderMode="none"><AppStack.Screen name="newsa" component={Newsa} /></AppStack.Navigator></NavigationContainer>);};export default (App);
Login.jsx
import { StyleSheet } from “react-native”;const styless = StyleSheet.create({
 container: {
 backgroundColor: ‘#f7f7f7’,
 },
 headerwraper: {
 backgroundColor: ‘#98FB98’,
 borderBottomLeftRadius: 30,
 borderBottomRightRadius: 30,
 },
 header: {
 padding: 28,
 flexDirection: ‘row’,
 justifyContent: ‘space-between’,
 alignItems: ‘center’,},
 iconWhite: {
 color: ‘#ffff’,
 },
 headertext: {
 fontWeight: ‘bold’,
 fontSize: 18,
 color: ‘#ffff’,},headert: {
 paddingTop: 40,
 paddingBottom: 70,
 alignItems: ‘center’,
 },
 imag: {
 width: 80,
 height: 80,
 borderRadius: 60,
 },
 content: {
 marginHorizontal: 20,
 backgroundColor: ‘#ffff’,
 borderRadius: 15,
 paddingHorizontal: 20,
 marginTop: -60,
 },
 title: {
 fontWeight: ‘bold’,
 fontSize: 18,
 color: ‘#2d2d2d’,
 paddingVertical: 20,},
 input: {backgroundColor: ‘white’,
 padding: 1,
 marginVertical: 5,
 height: 40,
 borderWidth: 1,
 borderColor: ‘lightgrey’,
 borderRadius: 2,
 },
 description: {color: ‘#989898’,
 textAlign: ‘center’,
 fontSize: 12,
 padding: 10,
 fontWeight: ‘200’,},
 buttonwrapper: {alignItems: ‘center’,
 marginVertical: 10,
 },
 button: {
 backgroundColor: ‘#4355ee’,
 width: 30,
 height: 30,
 borderRadius: 30,
 alignItems: ‘center’,
 justifyContent: ‘center’,
 },
 iconbutton: {
 color: ‘#fff’,}
})
export default styless;
Otp.jsx
import { StyleSheet } from "react-native";const styles = StyleSheet.create({container: {
        backgroundColor: '#FFFF',
        flex: 1,
        flexWrap: 'nowrap',
    },
    celltext: {
        alignItems: 'center',
        fontSize: 16,
    },
    header: {
        flexDirection: 'row',
        justifyContent: 'space-between',
        alignItems: 'center',
        padding: 20,},
    iconbutton: {
        color: '#fff',},
    headertitle: {
        fontSize: 18,
        fontWeight: 'bold',
        color: '#151515',
    },
    headericon: {
        color: '#151515',
    },
    svgWrapper: {height: 100,
    },
    content: {
        backgroundColor: '#98FB98',
        paddingBottom: 500,
        marginTop: -8,
        paddingHorizontal: 40,
        paddingTop: 20,
        alignItems: 'center',},
    otpdescription: {
        color: '#a2b2fd',
        textAlign: 'center',
        fontSize: 18,
        fontWeight: '600',
        paddingVertical: 20,
    },
    otptitle: {
        color: '#ffff',
        fontSize: 24,
        fontWeight: 'bold',
        textTransform: 'uppercase',
    },button: {
        backgroundColor: '#2c36bf',
        width: 40,
        height: 40,
        borderRadius: 40,
        alignItems: 'center',
        justifyContent: 'center',
        marginLeft: 80,},
    containerInput: {
        flexDirection: 'row',
        alignItems: 'center',
        justifyContent: 'center'
    },input: {
        backgroundColor: 'white',
        padding: 1,
        marginVertical: 5,
        height: 40,
        width: '50%',
        borderWidth: 1,
        borderColor: 'lightgrey',
        borderRadius: 2,
    },
    buttonwrapper: {alignItems: 'center',
        marginVertical: 10,
    },})
export default styles;
Just run the app and test it yourself. That's how we developed the OTP auth module using AWS Cognito and react-native.
Conclusion
In this article, we learned how to build a passwordless OTP authentication using AWS Amplify, AWS Cognito, and React-native. If you guys have any doubts or are stuck somewhere feel free to mention them in the comment section. As early as possible I will also mention a GitHub repo currently I am working on that.
Credits
If you find this article useful or if you see any improvements are needed, please do let me know below in the comment section. If you enjoyed this post, I’d be very grateful if you’d help it spread by emailing it to a friend.
